Contributing to an open-source testing project: Playwright

I'm very excited to have sucessfuly contributed to Playwright, a cross-platform, cross-language, open-source end-to-end testing framework backed by Microsoft and a large community. From here onwards, you can embed additional information (e.g., screenshots, notes, custom metadata) on the tests so that it can be shown later on in Jira, for example.
This is mostly a story about learning. In this article I'll go over the purpose of my contribution, how you can take advantage of it with concrete Playwright examples, and then I'll share what I learned throughout this process.
Purpose
As team members (developers, testers) writing test automation scripts to verify expected behaviour in our web sites/apps, we implement a set of actions and one or more assertions. Many times this is done at the UI layer. After running our tests (Selenium/Webdriver, Cypress, or Playwright based) we get a report that we can use to analyze the test results, either by looking at an HTML kind of report or by uploading it to a central place/tool where we can analyze it in more detail, for example to track historical results.
But the value provided by our test scripts is not just limited to the pass/fail result and the duration of the test. We need to be able to understand what happened, so we can diagnose the failure and get to the actual root-cause. Sometimes we may need to embed additional information, either as text or to a specific variable Screenshots are also quite useful, especially upon failures.
Initally this effort was mainly targeted at enabling this information for Xray, a well-known test management tool. But this need goes beyond this specific tool, and many users out there can also benefit from it if we (I and the community) could make it broad enough.
Embedding additional information in your tests
In Playwright, you can implement a test using test() as shown in the following example for validating the successful login flow in a certain website.
const { LoginPage } = require("../models/Login.js");

test.beforeEach(async ({ page }) => {
  await page.goto('https://robotwebdemo.herokuapp.com');
});


test.describe("Login validations", () => {

    test('Login with valid credentials', async({ page }, testInfo) => {
        const loginPage = new LoginPage(page);
        await loginPage.navigate();
        await loginPage.login("demo", "mode");
        const name = await loginPage.getInnerText();
        expect(name).toBe('Login succeeded. Now you can logout.');
    });

}
But how can we provide additional information that can be embed on the generated report (e.g., JUnit XML), so that other tools can take advantage of?
Some time ago, I've helped to define an evolved JUnit XML format that could provide the means to embed additional information at testcase level. JUnit XML doesn't have a very strict format but the fact that. I've quickly shared this format through the JUnit team and no big blockers appeared. Of course that only tools that can understand this evolved format, can then take advantage of it. Other tools should simply ignore them, except for one or another that have strict schema validation (whatever that schema may be).
This evolved JUnit XML format is now supported by Xray, TestRail (in-progress), and possibly other tools.
Then the question becomes: How can we make our custom metadata into the JUnit XML report?
Well, that requires testing frameworks to have a way of specifying this and somehow associate it to the current test.
That is precisely the scope of the contribution I've made for Playwright Test, the test runner provided by the Playwright team.
Configuration
To take advantage of the new capabilities which allow us to embed additional information at test level, first we need to configure Playwright to use the JUnit reporter; we then also need to configure a few additional settings. More info here.
In the Playwright configuration file (e.g., playwright.config.js), we would have something such this code snippet.
// JUnit reporter config for Xray
const xrayOptions = {
  // Whether to add <properties> with all annotations; default is false
  embedAnnotationsAsProperties: true,

  // By default, annotation is reported as <property name='' value=''>.
  // These annotations are reported as <property name=''>value</property>.
  textContentAnnotations: ['test_description', 'testrun_comment'],

  // This will create a "testrun_evidence" property that contains all attachments. Each attachment is added as an inner <item> element.
  // Disables [[ATTACHMENT|path]] in the <system-out>.
  embedAttachmentsAsProperty: 'testrun_evidence',

  // Where to put the report.
  outputFile: './xray-report.xml'
};

const config = {
  reporter: [ ['junit', xrayOptions] ]
};

module.exports = config;
After we've configured Playwright, we can focus on writting the Playwright test scripts.
To add custom metadata, we take advantage of Playwright annotations. We can access the TestInfo object for that, either by using test.info() or by specifying it as a parameter test('', async ({}, testInfo) => {});.
test('example1', async ({ page }) => {
  test.info().annotations.push({ type: 'issue', description: 'XPTO-1' });
  // ...
});

test('example1',  async ({ page }, testInfo) => {
  testInfo.annotations.push({ type: 'issue', description: 'XPTO-1' });
  // ...
});
In this case, assuming we have Xray Test Management, it understands at least these annotations:
- test_key: map this test code to an existing Test issue in Xray having the specified issue key;
- test_id: map this test code to an existing Test issue in Xray having the specified issue id; not that much used though;
- test_summary: the summary of the Test issue that will be autoprovisioned in Xray;
- test_description: the description of the Test issue that will be autoprovisioned in Xray;
- tags: list of one or more tags that will be added as labels on the corresponding Test issue in Xray, delimited by comma;
- testrun_comment: text comment to add to the test run as associated with the Test issue in Xray;
- requirements: issue keys of one or several stories/requirements in Xray, delimited by comma.
The test_description annotation as can be a lengthy text, will be encoded slightly different on the JUnit XML report; that's precisely the reason we have identified it as text on the textContentAnnotations setting in our config file shown above.
As we also aim to embed files (e.g., screenshots, other relevant evidence) and associate them to our test result, we need to identify the annotation we'll use for this using the embedAttachmentsAsProperty setting; in our case, we'll use the testrun_evidence.
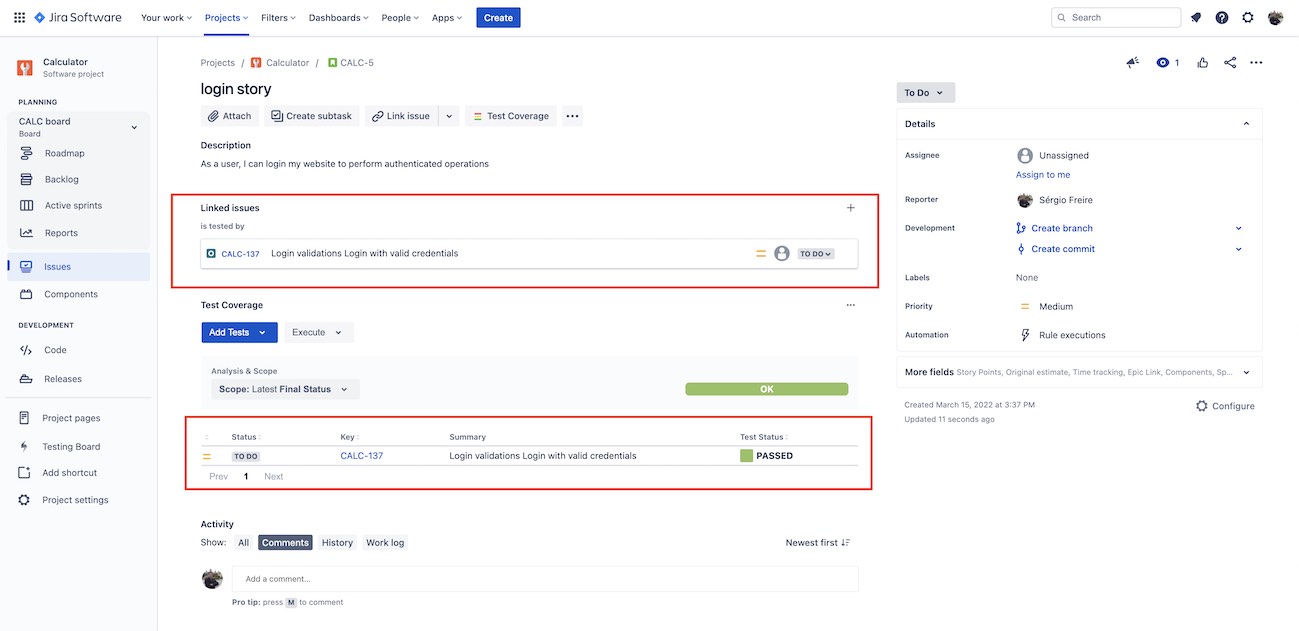
Link the test to a story or a requirement in Jira
In this case, we're covering an existing story with this test, right from the test code.
For that we add an annotation requirements having the value of the issue key of the item (story, requirement, or similar) in Jira; usually a test is linked to just one story/requirement.
This information will be added as a <property> on the underlying <testcase> element of the JUnit XML reporter produced by the built-in junit reporter, which then tools can take advantage of.
test('Login with valid credentials', async({ page }, testInfo) => {
        testInfo.annotations.push({ type: 'requirements', description: 'CALC-5' });

        const loginPage = new LoginPage(page);
        await loginPage.navigate();
        await loginPage.login("demo", "mode");
        const name = await loginPage.getInnerText();
        expect(name).toBe('Login succeeded. Now you can logout.');
    });
If, for example, you're using Xray for test management in Jira, then you whenever you upload the JUnit XML report (e.g., by REST API, Jenkins plugin, or other CI/CD tool), Xray will process it and will make the linkage/coverage between the corresponding Test and the identified story/requirement.
Here's an example of how it would look like in your Jira instance.
Attach screenshots and/or other files
In this case, we want to add some screenshot or even some other evidence as files associated with a given test result.
There are multiple ways to achieve it; internally they all work the same way as they'll be used to fill out an attachments array on the related TestInfo object.
test('Login with valid credentials', async({ page }, testInfo) => {
        const loginPage = new LoginPage(page);
        await loginPage.navigate();
        await loginPage.login("demo", "mode");

        // Capture a screenshot to a local file and attach it
        const path = testInfo.outputPath('screenshot.png');
        await page.screenshot({ path });
        testInfo.attachments.push({ name: 'screenshot.png', path, contentType: 'image/png' });

        // attach a text file; in this case we're writing the file first to the FS
        const file = testInfo.outputPath('evidence1.txt');
        require('fs').writeFileSync(file, 'hello', 'utf8');
        await testInfo.attach('evidence1.txt', { path: file, contentType: 'text/plain' });

        // attach a text content as file, without ever creating it
        await testInfo.attach('evidence2.txt', { body: Buffer.from('world'), contentType: 'text/plain' });

        const name = await loginPage.getInnerText();
        expect(name).toBe('Login succeeded. Now you can logout.');
    });
Here's an example of how it would look like in Jira, in case you have Xray and have uploaded the JUnit XML report.

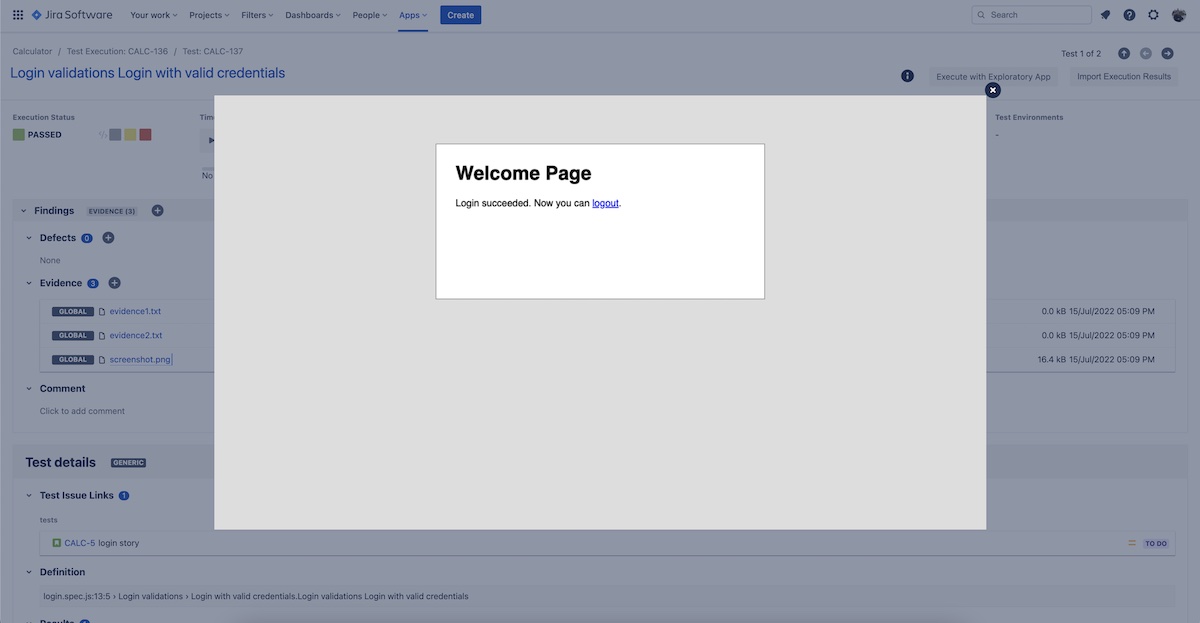
If we're focused on screenshots, Playwright can be configured to take screenshots on every test, or even better: if a test fails.
For the latter, we would adjust our Playwright config file as follows and everything will "automagically" work, without having to change the existing test code base.
...
const config = {
  reporter: [ ['junit', xrayOptions] ],
  use: {
    screenshot: 'only-on-failure'
  }
};

module.exports = config;
Learnings
After this process, I do have some learnings to share. Some of them are not new but I think it's worth mentioning them and reflecting a bit about them.
Embrace the challenge
Contributing to a major and well-known project, with a large code base, using a language that you don't know (i.e., TypeScript), and a set of practictes you aren't fully aware of, can be daunting. Besides, you see yourself trying to contribute to a project having people with much more expertise than you. Well, does this make it impossible? Not really. I told to myself, lets embrace the challenge and use it to learn more about Playwright, TypeScript, and also about interacting/contributing to a well-established project. It all started by an initial ticket/issue raised on GH, to get discussion started.
From a working prototype to prod is a long road
Making a working prototype is sometimes quite easy; you can make a hack to the existing code that makes what you need. But making something that can get to production and be used successfuly by others requires some additional work.
We need to:
- make your contribution not so specific
- ensure to provide some automated tests along with your code changes
- ensure (good) documentation
- be open for feedback; be kind but be able to mention the points that matter
Working in a totally remote environment, without calls, is possible
Working in a fully remote environment, is natural for most open-source projects. Playwright is a projected backed by Microsoft, so there is a team behind it. Besides, there is also the broad Playwright team made by all of its contributors.
During the discovery phase/initial conversations, or even during code review, having feedback on a reasonable time frame is key for success.
I was surprised by how helpful the team was, not just because I received feedback on time but also because they helped me throughout the process. I was a first time commiter on the project and I was also writing code in TypeScript for the first time... and it all went fine!
What made the contribution easier
Besides the help from the Playwright community/maintainers, the project itself is set up in a way that eases contribuitions. First, the contribution process is described which removes some initial friction. Second, the build process makes linting on the code and on the documentation; besides, a full battery of around 8.000 (!) automated test scripts ensures a good enough coverage. There are additional checks (e.g., for dependencies) that provide one additional layer of confidence.
Async can be challenging
Sometimes you just depend on yourself; actually, most times we probably depend on others. Collaboration is something positive but we can have some delays that hardens this process.
During this process, the Playwright team was pretty fast giving feedback; it's not real-time but it was quite good.
However, sometimes we have other priorities going on, some process/legal flows we have to follow, etc. And all of this can delay the whole contribution. Delays can cause, besides a certain frustration, also additional lack of efficency due to context switches.
You start with a problem or a goal and you end up finding another ones
Sometimes you start by fixing some bug that you are well aware of, or implementing the feature that you imagined (e.g., such as the one I highlighted here). But the process is never a straight road where you go blind towards your destiny. During your trip you'll notice other things (perhaps by serendipity - "lucky findings"), and that's great because it means that you're not just coding/fixing something; you're learning through the way! I've found a minor encoding problem in character data (i.e. "CDATA") in the JUnit XML report, which we discussed, and I've fixed. Meanwhile, I found another issue that I've yet to report. All this is normal, because we as humans and smart people learn... and as we learn we seek to improve.
In sum
Contributing to a major project can be overwhelming, especially whenever we have limited context about it, its tecnologies, or even the team. But we can always learn; as testers, or as people with testing skills in their heart and soul, we're already used to it.
In the end, this was both a learning exercise and also somethign that hopefuly will be used by many of you out there.
It feels great to use open-source software; it feels greater whenever we can contribute to it!
Feel free to reach out in case you have further suggestions :)
Note: in case you want to see a full tutorial showcasing Playwright integrated with Jira and Xray, please have a look at this tutorial.
Thanks for reading this article; as always, this represents one point in time of my evolving view :) Feedback is always welcome. Feel free to leave comments, share, retweet or contact me. If you can and wish to support this and additional contents, you may buy me a coffee ☕